Test the soil before you sow
By Tim Bartimote - Cropping Officer
March 2020
Throughout the Central West there has been various amounts of rain in the last couple of months. This has prompted a buzz of excitement in the industry and producers are considering their sowing options.
Understanding the soil where crops are being placed is vital for making informed management decisions. This is why soil tests are important. They provide a clear snapshot of the current state of the soil and are crucial for maximising yield through optimal plant nutrition. They help identify soil constraints which are impacting production and discover potential savings. For example, using the same fertiliser or liming program for years on end may be providing more than is required. A soil test can determine if this is aiding in increasing production or just wasteful. The International Plant Nutrition Institute has developed the 4R’s of plant nutrition and these are: using the right fertiliser source, applied at the right rate, at the right time, and in the right place. To get these right, it's important to know what is happening in your soil.
What to test for
There are a number of different options when it comes to soil testing, in terms of depth in the profile and what facets of the soil to measure. Generally it is preferred to sample at 0-10cm and again at 10-60cm. The 0-10cm sample would typically undergo a complete analysis which may include pH, electrical conductivity, organic matter percentage, nitrogen, phosphorus, phosphorus buffering index (PBI), potassium, sulphur, chloride, cation exchange capacity (CEC) along with the proportion of calcium, magnesium, potassium, sodium and aluminium. Finally measurements of copper, zinc, iron, boron and manganese is also useful information. The 10-60cm test would typically only include sulphur and nitrogen, as these nutrients are much more mobile in the soil profile compared to other macronutrients such as phosphorus. Producers may even decide to go further with this second test e.g. 10-90cm, depending on the depth of the soil profile. This test is important for observing what is currently in the tank for nitrogen budgeting purposes, as it is a big driver of crop yield. Sulphur on the other hand, is integral for nitrogen uptake in plants, and crops like pulses as well as canola are massive users of sulphur.
When to soil test
Ideally soil tests should be completed as close to the sowing event as possible. This is because soil characteristics can always vary to some degree due to multiple factors such as rainfall. The closer the test is to sowing the more likely it will reflect the soil at sowing time. Make sure to factor in the time for the soil samples to be tested and the results returned. This is so they can influence fertiliser decisions at the beginning of the season.
In terms of frequency, generally about every 2 to 3 years for a complete 0-10cm test in each paddock is suitable. This provides enough information to monitor the change in various soil characteristics over time while not being a major expense at the start of each season. As the total number of paddocks to be tested can be spread out over this time period. However, it is recommended to do a deep soil test (10-60cm or 0-60cm when not doing a shallow test) for nitrogen and sulphur every year. This is because nutrition is essential for maximising yield in our crops and the concentration of nitrogen and sulphur can at times change significantly from season to season.
Where to soil test
Soils tests demonstrate a “paddock average” of nutrient levels. Sites are randomly located through using a transect and then the samples are combined to be sent to the lab for testing. The transect may embody a W ,V or similar shape which provides a representative sample from the paddock (Figure 1). Ideally, the more samples sites the better but this also has to be practical. Keep sites an even distance apart and stay within the same soil type. If a paddock has multiple soil types, choose the soil type that covers the majority of the area or conduct separate tests in each soil type.
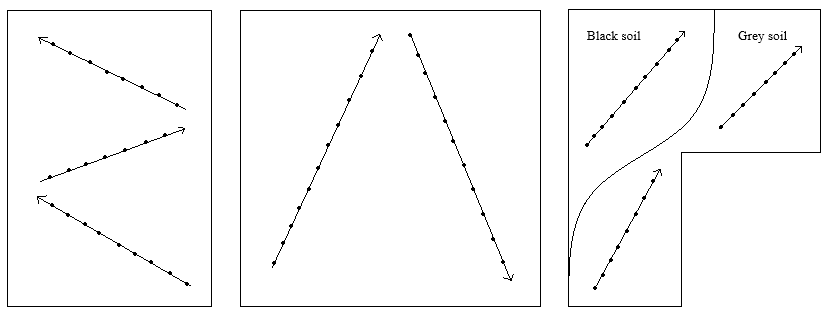
Figure 1. Examples of soil sampling methodology in various paddock configurations and where changes in soil type within a single paddock may occur.
What the results mean
As the main season sowing window approaches, results from your soil test will inform you as to what starter fertiliser and how much may be required for your crop yield targets. It will also influence nitrogen budgeting and determine the requirement of an in-crop application of nitrogen later in the season. Your test may also point to soil constraints which could require amendments going forward.
To organise a soil test contact your local ag reseller. An interpretation of your test can then be provided by your trusted accredited agronomic advisor. For more information on soil testing feel free to contact your local LLS ag advisor.
More information:
- Agriculture Victoria (2009) Sampling soils used for growing pastures, field and fodder crops. http://agriculture.vic.gov.au/agriculture/farm-management/soil-and-water/soils/sampling-soils-for-growing-pastures-field-and-fodder-crops
- Barr R (2015) Get the right advice on soil tests. GRDC. https://grdc.com.au/news-and-media/news-and-media-releases/south/2015/02/get-the-right-advice-on-soil-tests
- GRDC (2013) Crop Nutrition Fact Sheet. https://grdc.com.au/__data/assets/pdf_file/0025/194443/grdc_fs_better-fertiliser-decisions-for-crop-nutrition_high-res-pdf.pdf.pdf
- NSW DPI (2004) Results Interpretation. https://www.dpi.nsw.gov.au/about-us/services/laboratory-services/soil-testing/interpret